How to Add Mouse-Follow Zoom in OBS for Tutorial Videos
If you record tutorials in OBS, you have probably run into the same awkward problem a lot of creators hit: the recording feels perfectly clear when you make it, but once the final video is compressed and watched on a smaller screen, people are no longer sure what you clicked, where the important button was, or which part of the interface they were supposed to be looking at.
This gets even worse on 2K and 4K desktops, or when your workspace is dense to begin with. You might be moving through menus quickly and everything feels obvious to you in the moment, but for the viewer the screen is doing too much at once. That is the reason I started liking local zoom plus mouse follow inside OBS. Not because it looks flashy, but because it solves a real tutorial problem: it gently pulls attention toward the part of the screen that actually matters.
Choosing a Version: Python or Lua
The older setup a lot of people still find first is angeldeejay/obs-zoom-to-mouse. The concept is simple and still very useful. OBS zooms into a source, then the visible region follows the cursor so the viewer can stay with your actions instead of scanning the whole screen.
That said, I would not blindly start there today if you are setting this up from scratch. The original repo already says the project is no longer actively maintained, and it explicitly points people toward BlankSourceCode/obs-zoom-to-mouse, which is a Lua-based alternative. For most creators, that recommendation makes sense. The Lua version is usually easier to live with because you are not spending your first round of effort just getting a Python runtime and OBS scripting environment aligned.
I still think the older Python route is worth understanding, though, because plenty of existing notes and copied setups still refer to it. If what you already have is a Python-based configuration, the real question is not whether it is “outdated” in some abstract sense. The question is whether it is stable enough for your workflow, or whether moving to the Lua version will save you time and friction right away.
Understanding the Feel: How the Zoom Moves
The thing I like about this whole approach is that it helps where normal full-screen recording often falls apart. A fixed screen capture can be technically sharp and still be tiring to watch. Small buttons are easy to miss. Cursor movement gets lost. Dense layouts force viewers to keep hunting for your focus point. A good zoom-follow setup fixes that by acting like a very light camera assistant. It nudges the frame toward what you are doing without forcing you into a lot of manual editing later.
Where people get disappointed is usually not the idea itself, but the tuning. If the zoom is too aggressive, or the follow behavior kicks in too early, the recording starts to feel like the whole frame is being dragged around by the cursor. That is why I do not treat this as a “dramatic effect” tool. It works best when it stays subtle. The viewer should mostly feel guided, not jolted.
Installing the Python Version
If you stay with the older Python version, the install path is still the usual OBS scripting route. You install the requirements into the Python environment you plan to expose to OBS:
python -m pip install -r requirements.txtor:
python3 -m pip install -r requirements.txtThen you go into Tools -> Scripts inside OBS, point OBS at the same Python environment, load zoom_and_follow_mouse.py, and choose the source you want to zoom. The common failure here is not the command. It is that the dependencies get installed into one interpreter and OBS is pointed at another. Everything looks correct on paper, but the script still fails because those environments do not match.
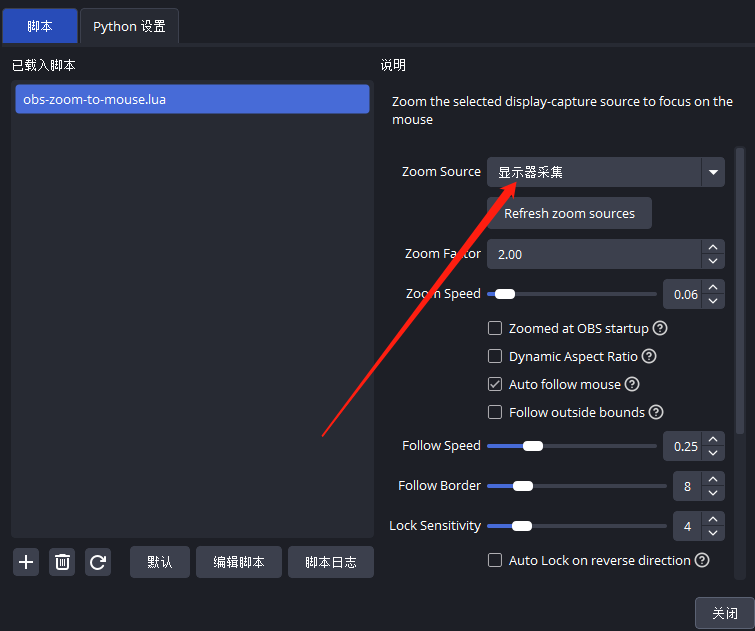
This is roughly what the script panel looks like once it is loaded. The important controls, like zoom amount, motion speed, and follow boundary, all live here:
Tuning: Hotkeys, Parameters, and Common Pitfalls
If you are starting fresh, though, I would still lean toward the Lua version first. It feels more like “install, tune, record” and less like “prepare a scripting environment before you can even judge whether the workflow suits you.” For creators who publish often, that difference matters more than it sounds.
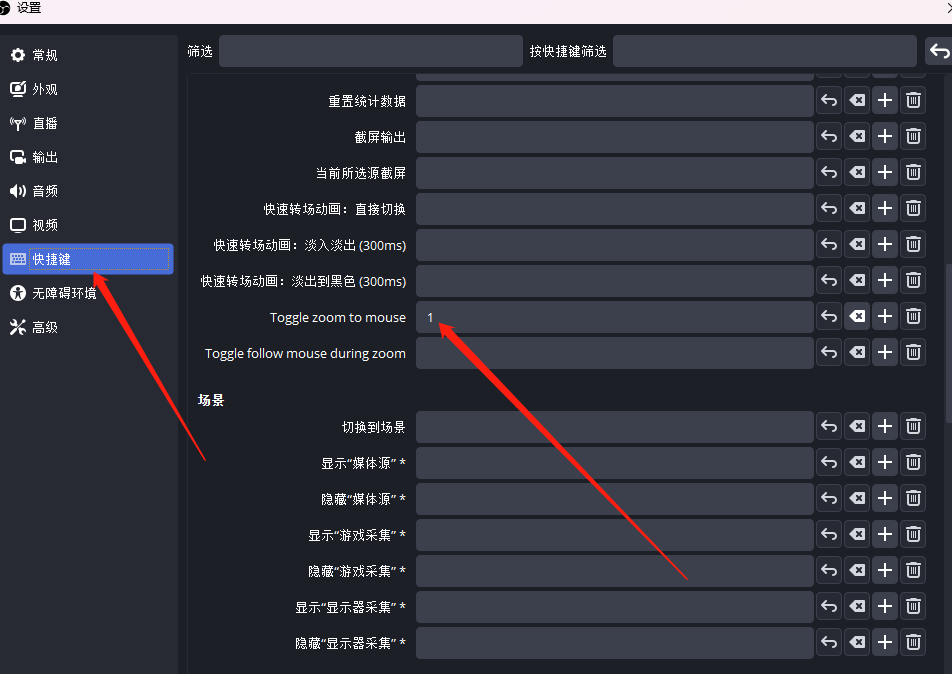
And honestly, the part that takes time is not installation anyway. It is deciding how the zoom should behave. In OBS, the controls you will care about most are usually under Settings -> Hotkeys. At minimum, I would set one hotkey for toggling zoom and another for enabling or disabling follow mode. I would also keep them easy to hit. When you are explaining something, operating software, and keeping your speaking rhythm together, awkward hotkeys become friction immediately.
The settings that really shape the result are usually some version of these:
Zoom Factor      how close the frame gets
Zoom Speed       how fast the zoom animation runs
Follow Speed     how quickly the frame catches up to the cursor
Follow Border    how close to the edge the cursor must be before tracking begins
Lock Sensitivity how easily the frame settles and stops moving
I prefer conservative values first. Zoom enough that the viewer can actually read what matters, but not so much that they lose their sense of the whole interface. Keep follow speed moderate so the frame glides instead of snapping. Keep the follow border fairly tight so the view stays calm until your cursor is clearly leaving the current working area. What usually feels best is not “the frame is always chasing me,” but “the frame knows when to stay still and when to help.”
The screenshot below is the kind of preview that makes the value obvious. It is not about fancy movement. It is about keeping the active region readable while you keep recording:
Another thing that trips people up is the source itself. If you are using Display Capture, life is usually easier because the script can reason about the source position and dimensions more reliably. If you are trying to zoom a cropped window, a duplicated source, or something that has already been resized and moved around inside the scene, cursor position and zoom area can drift out of alignment. At that point it feels like the script is broken, but often the real issue is just that the source geometry is no longer straightforward.
That is why I think this setup shines most in practical desktop tutorials: software walkthroughs, admin demos, content creation tutorials, coding videos, anything where a standard desktop capture is the main visual layer. It can still be stretched beyond that, but once your scene graph gets complicated, the setup stops being effortless.
One detail from the older notes is still worth keeping: if you want separate zoom behavior for multiple sources, the stable option is often to duplicate and rename the script file, then assign each copy to its own source and hotkey set. It is not elegant in a theoretical sense, but it is very usable, and for content workflows that is usually the right tradeoff.
So my take is pretty simple. This is a good idea, and for tutorial creators it is more useful than it looks at first glance. If you are setting it up now, I would try the Lua version first. If you already have a Python-based setup, make sure OBS is pointing to the right interpreter, the source selection is correct, and the hotkeys are actually comfortable to use before you decide to migrate. More than anything else, aim for three things: viewers can see the important part of the screen, the frame does not feel restless, and you do not create extra editing work just to make the tutorial readable.